thought
 thought by Katerina Karmanovskaya
thought by Katerina Karmanovskaya
thought by Katerina Karmanovskaya Published on 500px
02.11.2010 смотреть >>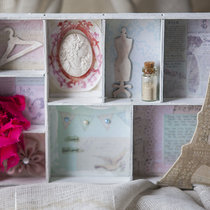 Paris Shadowbox
Paris Shadowbox
Долго вынашиваемая идея имеет у меня свойство трансформироваться. И первоначальная задумка сделать Shadowbox про Париж больше стала походить на то, что я делаю панно про столицу моды. В итоге, получилось очень "девочковое" украшение в дом. First I thought to make a Paris shadowbox. Then I thought my shadowbox more about capital of fashion. In the end I made a decoration for the girl house :) Детальки. Очень люблю этот прием - натирка, покрытая "Глосси": Details. I like to use this technique - rub-bon with glossy: "Шаль", небрежно кинутая на полку :) There is the 'shawl' on the shelf :) Манекен, покрытый, как и вешалка, сначала акриловой краской, затем спрыснутый розовым спреем с блестками: Mannequin and hanger was covered first with acrylic paint and then sprinkled with pink glitter spray: Ну, и куда же без эмблемы Парижа: And of course there is an emblem of Paris: На сегодня все :) That's all :)
25.11.2012 смотреть >> Мысли. . .
Мысли. . .
Helmut Newton Часто меня спрашивают, как я отношусь к творчеству данного фотографа и считаю ли я что это искусство?! Долго я старался уйти от ответа на этот вопрос, так как во мне было несколько ответов, либо это хороший пиар и кич, либо я что-то не понимаю. Пока более детально не познакомился с автором и ответ стал для меня очевиден. А что думаете Вы, искусство ли это?!
01.12.2013 смотреть >>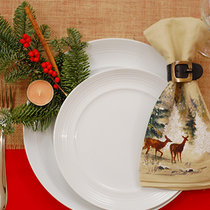 Christmas Eve table
Christmas Eve table
Originally published at Yellow Chimney. Please leave any comments there. Celebration is the anticipation of celebration. I was told that when I was a little girl, and every year I discover new meaning in this phrase and find new proofs to it. Celebration is the awaiting of celebration. It is the preparing, the invites you sign, the cards you send to your friends, it is choosing gifts and menu, working over decoration – all that makes your heart leap, smile cross your face and improves your mood. Every year I feel it more and more clearly that anticipation is a part of celebration and feel joy just preparing to celebrate. And every year I begin to prepare a little earlier than last year ’cause it prolongs the festive feeling. Now when Halloween is not yet here, I check Christmas catalogues and look through the photos of previous years celebrating. And I just thought it might be interesting to you to look at our last year Christmas table setting and borrow couple of ideas maybe. These are two options we used. Both with burlap, wood, Christmas tree branches and cinnamon. The first: Read the rest of this entry »
28.10.2014 смотреть >>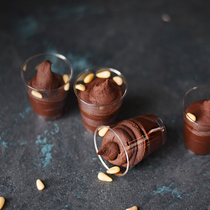 Delicious Vegan Chocolate Mousse (yep, I just used ‘delicious’ and ‘vegan’ i
Delicious Vegan Chocolate Mousse (yep, I just used ‘delicious’ and ‘vegan’ i
Originally published at Yellow Chimney. Please leave any comments there. What do you usually think when you read the words “gluten free, dairy free, raw, vegan” in the name of a recipe. “How’s that stuff gonna be tasty?” – is my first thought. To swap real smooth rich creamy butter for an avocado? Am I crazy or what? No, that’s not for me. I don’t want to offend anyone, I assume I just like the classic cakes too much. But as a homebaker sometimes I do gf, df, vegan and raw cakes for my clients. And sometimes I have a little leftovers of my cakes and bakes which I try to be sure that the cake is fairly good. And this is exactly how I discovered this avocado based vegan chocolate mousse. I was making chocolate cake for a meet-up of some group, half of the members of which were vegans and the other half was about to become ones. I found couple of recipes, combined them and made some delicious mousse. My son is not a fan of chocolate, but my 4yo daughter ate 3 portions of that. It is as rich chocolate as a proper brownie and as smooth and creamy as classic ganache. Can you believe that? Try yourself! Recipe: (makes 15 shots, cooking time 20 minutes) Read the rest of this entry »
28.03.2016 смотреть >> Delicious Vegan Chocolate Mousse (yep, I just used ‘delicious’ and ‘vegan’ i
Delicious Vegan Chocolate Mousse (yep, I just used ‘delicious’ and ‘vegan’ i
Originally published at Yellow Chimney. Please leave any comments there. What do you usually think when you read the words “gluten free, dairy free, raw, vegan” in the name of a recipe. “How’s that stuff gonna be tasty?” – is my first thought. To swap real smooth rich creamy butter for an avocado? Am I crazy or what? No, that’s not for me. I don’t want to offend anyone, I assume I just like the classic cakes too much. But as a homebaker sometimes I do gf, df, vegan and raw cakes for my clients. And sometimes I have a little leftovers of my cakes and bakes which I try to be sure that the cake is fairly good. And this is exactly how I discovered this avocado based vegan chocolate mousse. I was making chocolate cake for a meet-up of some group, half of the members of which were vegans and the other half was about to become ones. I found couple of recipes, combined them and made some delicious mousse. My son is not a fan of chocolate, but my 4yo daughter ate 3 portions of that. It is as rich chocolate as a proper brownie and as smooth and creamy as classic ganache. Can you believe that? Try yourself! Recipe: (makes 15 shots, cooking time 20 minutes) Read the rest of this entry »
28.03.2016 смотреть >>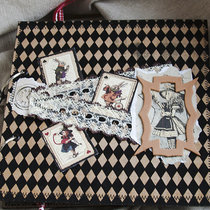 ScrapBlog. ru DT call
ScrapBlog. ru DT call
Долго я думала, подавать ли еще одну заявку в ДК, и все-таки решилась. ScrapBlog. ru ищет себе двух дизайнеров из Москвы. Надо выбрать свою любимую работу и показать ее в отдельном посте. I thought for a long time about another DT and yet decided. ScrapBlog. ru is looking for two designers from Moscow. It is necessary to choose your favorite work and show it in a separate post. Что хотите со мной делайте, но любимой работой я все-таки считаю альбом " Alice in Wonderland ". And you can do anything, but my favorite work is the album " Alice in Wonderland ". Но, поскольку я ее демонстрирую каждый раз, я решила выбрать еще одну. Я очень довольна одной из своих последних работ - альбомом " Воспоминания ". But I demonstrate it every time, so I decided to choose another one work. I like one of my last works - the album " Memories. " Я даже не могу выбрать оттуда любимый разворот, потому что они все мне очень нравятся. I can not even pick out my favorite spread, because I really like all of them. Держим кулачки? :) Keep fingers crossed for me? :)
07.02.2012 смотреть >>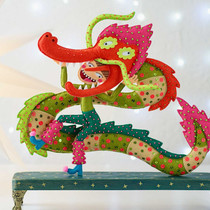 Танец дракона
Танец дракона
Грохочут хлопушки, в восторге толпа, Дракон извивается – праздник с утра! Он пляшет, смеётся, изгибы крутя, Хвост ловит ритм, танцует летя. Барабаны гремят – земля дрожит В воздухе конфетти, всё шумит. Толпа замирает, причина видна Дракон проплывает, как живая волна. Он скачет, петляет, блестит чешуёй, То плавный, то бойкий, всегда заводной. Здесь танец – не просто движенье хвостом, А символ всех благ на шаре земном. И кажется вдруг, в этом шуме цветном, Что счастье возможно – веселье кругом. Пока тот дракон продолжает свой бег, Удача в кармане твоём, человек! Chinese Dragon Dance Figurine – Lunar New Year Decor, OOAK Textile Sculpture If you’ve ever watched a traditional Chinese Dragon Dance and thought, “Yes, but what if the dragon were fabulously polka-dotted, slightly unhinged, and carried enthusiastically by one extremely committed performer?” – then welcome. Your moment has arrived. . . ETSY. COM Пока доделываю все начатые сто лет назад работы. Но в скором времени хочу начать воплощать новые идеи
14.12.2025 смотреть >>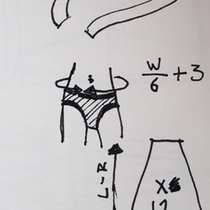 "victorian" skirt how to
"victorian" skirt how to
Оригинал взят у learningtoflylj в "victorian" skirt how to Hello, I am totally new to this community, but I was asked over at diy_tutorials if I could post it over here to :) How to sew a two in one "Victorian" skirt So I thought that I would share my how to for this quite easy sewn skirt in taffeta that I made for a friend of mine, it is a two layer skirt with strings so that you can tie up and drape the panels as you wish. This is a bit simplified, On the original skirt the top of the skirt was lined with satin so it was not completed in the exact same way as in this tutorial, but trying to explain that whole deal was to time consuming to be worth it. Material you will need: Fabric: Of your choice, around 2 times the length of your skirt A zipper: I use a hidden zipper because I think it looks better, but a ordinary one is just as good. String: The length of your drapes and a little more *2*6 (you chose one can both have it the whole way up on the skirt or just half, or something similar) I use cotton string 0, 5 cm (0, 2 inches) thick. 1 The pattern is a really easy one, it consist of 12 panels and then a long rectangle that is the ruffles. The fist thing you have to do is calculate your panel pieces, this is done like this. You measure were you want the skirt to sit. Then take that measurement and divide it with six, (the number of panels that goes into making one of the layers). Then add your sewing allowance to that number, I use 1, 5 cm (0, 6 inches) on each side so I simply add 3 cm. (1, 2 inches) A slightly larger sewing allowance is preferred since we are using it for the channels to the strings later. Now you have the number of the top of your panel. Now take the measurement on how long you want the whole skirt to be - the length of your ruffle (you decide the length yourself, my ruffle were approximately 18 cm (7, 1 inches) ), this is how you get the length of your panels. You can chose how wide your skirt is now, I usually use the width of the fabric to decide this, so that when the fabric is folded double I can put three panels beside each other and that way get six pieces when I cut it. (see next picture) To calculate this you take the width of the fabric folded double - the top of the panels measurement divided in two. This number is the width on the bottom of your panel. 2 Now it is time to lay out your pieces, I pain directly on the fabric with a fabric pen, but you can cut the panels into paper pieces if you want to. But I find it easier to just draw on the fabric. The pieces for the overskirt should be cut approximately 7 cm (2, 8 inches) shorter then the underskirt pieces. For the width of the ruffle pieces I use the width of the fabric one again, how long they are is up to you. I use four rectangles the width of the fabric to make the ruffles on one layer of the skirt. Cut your pieces out you will not have 12 panel pieces, with six pieces of them being shorter then the other six and eight ruffle pieces that are identical to each other. Beside you, you will also have your sipper and all the string that you need. Lets start sewing. 3 Zig zag all around your pieces or overlock them if you have the ability to use the serger. Put the pieces in piles, one for the overskirt (the six shorter panel pieces and four of the ruffle pieces) and one for the underskirt (the six longer panel pieces and four of the ruffle pieces) 4 We are staring with the overskirt, the first thing we do is to attach the zipper. To two of the shorter panels. 5 Then you attach the rest of the pieces to each other good sides together, but do not sew the last panels together. It makes the next two steps easier. 6 Iron your sewing allowance apart. 7 Now we are doing the channels, Simply sew 1 cm (0, 4 inches) from the seam keeping the panels together to create the channels. Do this on all pieces, and so that you have one channel on each side of our panels. Then sew the last panels together, iron the seam allowance flat and do the channels just as you did the other channels. 8 Turn the skirt so that you have the seam allowances on the inside. You will now have 12 channels if you have made it correctly. 9 Sew the four ruffle pieces together, and iron the seam allowance flat. 10 Fold over 1 cm (0, 4 inches) and hem the bottom of the ruffle 11 Sew a gathering seam at the top of your ruffle, I use my machine set on the longest straight seam that I can use, but this can be made by hand to. 12 To make the ruffles even, put pins with all the same length between them at four places on the bottom of the skirt. The ruffle is already conveniently marked on four places by the seams. 13 Now attach the ruffle piece to the skirt at these four places, (remember: the pretty sides to the pretty sides of the fabrics). Then by pulling the end of the ruffle seam, make ruffles and pin them as you go along. 14 Sew the ruffles to the skirt. 15 See, nice ruffles you have now. 16 Now is the time to cut your strings, The sting is supposed to be twice the length of your drapes plus bit more. Cut six pieces. 17 If you want to make a skirt that you can drape a bustle with, I suggest that you have long drapes. 18 Thread a blunt needle with your string and pierce the top fabric of a channel. It should not go though to the front of the skirt. Then pull the string through the channel as long as you want the drape to be and then pierce the channel again, jump over the seam that connects the two panels and pierce the channel again. Pull the string trough the cannel back don to the ruffle again and pierce the channel again. Trim the edges of the string and knot the ends so they don’t disappear into the channels. Do this with all the strings. 19 The ends of strings should not be longer then the ruffles, this way they are not seen at all. 20 Now the overskirt is done! 21 Now repeat step 5 to 16 but with these exceptions: In step 5: in stead of inserting a zipper, sew the channels together but only up to the pint were the zipper should have been. In step 6: do sew the last channels together. Ignore step 8 and 9. Now you will have one overskirt, and one slightly longer underskirt. 22 Now put the skits tighter as they should be, the overskirt over the underskirt. Fold in the seam allowance at the opening for the zipper on the underskirt and fold down together the top of the under and overskirt and hem it 1, 5 cm (0, 6 inches) in. Hand sew the opening for the zipper on the underskirt to the overskirt to make it look neat. Then your skirt is officially finished. :D To show of the poof this skirt could need some underskirts or a simple one hoop crinoline. Under the skirt in the picture in the top is a crinoline, the crinoline is sewn as a simple skirt with the only difference is that there is steel boning in the bottom hem. As you see here, one can make both long and short skirts this way, in this skirt I in bridal satin, and have two layers ruffles on the underskirt, the ruffles are also shorter on this skirt. Good luck with your project.
14.02.2014 смотреть >>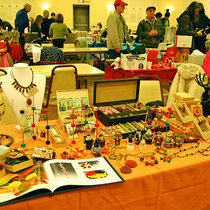 My First Flea Market
My First Flea Market
This Sunday I was working as a vendor at a local flea market. It was my first time selling my works in public. I was very glad to see the reaction, how people look at my works and what they say to me - all this was very pleasant:) Almost every person at the market stopped and smiled at my salty little creatures - fantastic experience!:) I love the thought I can make people smile so nicely! I was afraid I couldn't organize my table. But it turned out to be pretty much ok. это еще самое начало, народу нет, и не все столы еще заняты продавцами. Первая ярмарка прошла успешно! Ура!;) Устала очень, но все прошло отлично. Было много посетителей, мой стол стоял прямо у входа/выхода (приятная неожиданность;) - и все проходили мимо него как минимум два раза. Ужасно радовало, что почти каждый посетитель останавливался, разглядывал и улыбался моим соленым человечкам! :) Троих купили в итоге;) Но особенно приятно было дождаться "своих" покупателей - видно было сразу, что элегантная мама со взрослой дочкой вернутся и обязательно что-то купят. Что они и сделали - скупили у меня в итоге подарки на всю семью, наверное;) Я им забыла положить один брелок, запуталась в куче коробочек. Когда опомнилась, было уже поздно. Но я сразу повесила объявление себе на сайт, а они зашли, увидели его и написали!;)) Так что встретимся - отдам забытое. Очень неприятно было, но рада, что сила интернета помогает справится и с таким!;) Зато теперь они хотят еще одно колечко;) Боялась, что стол не получится красиво оформить. Но для первого раза нормально. Тем более, что вокруг были столы с наваленными в кучу шмотками вообще;) Рядом со мной сидела женщина, которая покупает дешевые железяки на е-бее по оптовым ценам и перепродает их на блошиных рынках. Профессиональная такая продавщица - бегает на все ярмарки, знает всех таких же постоянных продавцов и говорит, что есть и постоянные покупатели, которые вместе с ними бегают от блошки до блошки;) Колечки стальные у нее были по 5 и 8 долларов, браслеты тоже по 5. Серебро (вроде похоже, что серебро;) по 30-35. Я сидела рядом со своими ценами и переживала, что покупатели посмотрят на мой кулон за 20 (я считаю, что это очень дешево;) и потом подойдут и купят у нее рядом железяку литую с камешком за пять. Но как и вышло, у нас была разная клиентская направленность и разная ценовая политика, и мы сидели и весело болтали. Тем более, что она купила у меня кота-солонку и колечко серебряное (и кажется потратила на это половину своего заработка;). У нее были свои серебряные кольца, целый лоток, но ей мое все равно понравилось;) Видимо она устала от своего пакистанского серебра настолько, что ей новенького захотелось. В итоге у нее покупали чаще за дешево, у меня реже, но сразу за много;) Обе политики себя оправдали. Жалко, что зимние праздники только раз в году. В другое время так активно не покупают все-таки. А то имело бы смысл по воскресеньям бегать на такие рынки и там торговать. Но все равно, надо посмотреть и сходить еще на парочку таких ярмарок, или на уровень повыше. А то на блошином рынке я была одна с хэндмейдом, а кругом дядьки с пластинками и китайцы с китайскими бусиками;) Положительные выводы - человечки и книжка с фотографиями для привлечения внимания очень и очень удачно были мной поставлены. Минусы - надо придумать как вешать кулоны получше. "Вешалки" для чашек мне не помогли практически. Вместо них надо докупить еще две шеи как минимум. Но загромождать стол подставками тоже некрасиво (я видела на одном из столов 30 кулонов на подставках - не смотрится). Но 5-6 штук наверное нужно. Сундучки смотрелись неплохо - и покупателям копаться в них удобно и приятно было;) Тарелочки и коробочки для мелочовки мне тоже понравились. "Лесенки" для сережек я собрала из детского конструктора, купленного за 99 центов;) Как детский конструктор он ужасен, а как витринка для сережек - отлично;) Но я все равно хочу рамку от фото или картины сеткой обтянуть, как я видела в одной палатке - и сережки цеплять за эту сетку. Скатерть удачная, но погладить ее все-таки надо было;) И бирочки-ценники на веревочках купить не лениться! Замучилась ценники лепить. А какие у вас есть советы и идеи по оформлению столов на ярмарках? (про терку под сережки я знаю;)
13.12.2011 смотреть >>


