
draw
 pre DW5
pre DW5
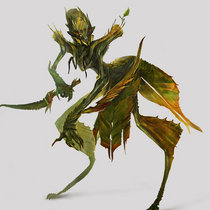
Some concepts for preDW5. http://www. dominancewar. com/2010/preliminary/en_rules. php Hope you like it :) Just wanted to draw something. . . strange and funny :)
07.12.2010 смотреть >>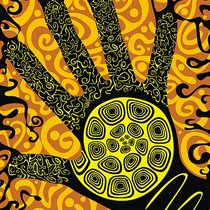 Небисерное
Небисерное
Парочка моих работ, сделанных в Corel Draw. Совсем забросила рисование, рисунки годичной давности. . . Это все бисер виноват.
21.03.2010 смотреть >> catching up post #6 (year 2019)
catching up post #6 (year 2019)
( ++++++++++++++++++++++++++++ ) comments
26.12.2019 смотреть >>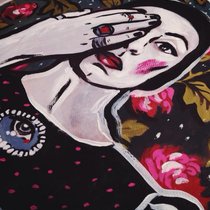 Автопортрет в красках. .
Автопортрет в красках. .
Автопортрет вот случился. . Акрил, бумага 40х40
20.11.2014 смотреть >> Автопортрет в красках. .
Автопортрет в красках. .
Автопортрет вот случился. . Акрил, бумага 40х40
20.11.2014 смотреть >> Автопортрет с Фламинго
Автопортрет с Фламинго
"Автопортрет с Фламинго" акрил, бумага 40х40
24.11.2014 смотреть >>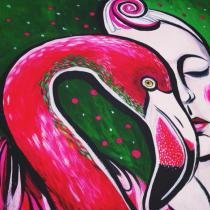 Автопортрет с Фламинго
Автопортрет с Фламинго
"Автопортрет с Фламинго" акрил, бумага 40х40
24.11.2014 смотреть >>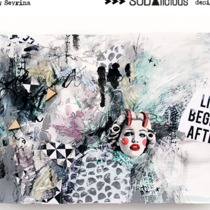 Мастер-класс: разворот в арт-журнал.
Мастер-класс: разворот в арт-журнал.
Всем привет! Дублирую мастер-класс для Sodalicious Спасибо Ире за перевод)))) Ира, ты моя спасительница!!! Немного добавлю по-русски, а так я думаю все понятно)) step. 1 Take a your favorite sketchbooks. Also I will use the pattern of mini-set paper "who lives here", magazine clippings, a pencil, stamps and some decorations. Сектчбуки от Соды очень классные с плотной бумагой, единственный момент: надо следить за тем, чтобы в середине не скапливалось много влаги, иначе разворот "выпрыгнет" из скрепок))) step. 2 I cover page with using a gesso for better adhesion between the layers. Гессо я использую не всегда особенно если пользуюсь акварелью. А если я планирую сделать многослойную композицию, то грунт обязательно нужен. Он скрепит слои и уплотнит бумагу. step. 3 Draw a pencil flowers on a photo. I did not have the goal to make an exact copy, I would only use a texture of pencil drawing. Здесь мне захотелось поиграть с фактурами и я решила порисовать простым карандашом, особо не старалась реалистично это сделать, так как не знала насколько потом перекрою карандаш другими слоями. step. 4 Add some color with acrylic paints. Немного мазков акрилом. step. 5 Cut the some of the paper and stick over the picture. I mix texture: pencil + pattern Здорово подошла бумага из вот этого мини-набора, по размеру паттерна особенно. step. 6 Use stamps. I like to do this is unusual, for example, to make a print incompletely or wipe by the stamp in some places as if to slide on ice like here. Здесь я как бы "скользила" штампиком, это очень удобно делать именно по грунтованной бумаге. step. 7 Now I stuck magazine clippings. Sometimes I draw itself and in this case I came across an interesting picture of a female head and I decided to use it. Вырезки из журналов, удачно попалась иллюстрация. step. 8 I use a labels from the sheet "so delicious notes / i eat cookies in bed". Текст дает смысловую нагрузку для картинки, но не всегда нужен смысл какой-то вообще, в арт-журналах можно все!!! step. 9 I add more details, write a markers by hand, the meaning of the text does not necessarily have to be. Для детализации пишу от руки надписи маркером. step. 10 A little more texture, add a plywood chipboard. Check the composition, if necessary I add a splash of paints and ink. Добавляю подтеки тушью, где-то замазываю краской чтобы объединить весь разворот и еще пару чипбордов добавляю для смешивания текстур опять же. Все готово!!! Спасибо за внимание! Done! Thank you, I hope you liked it!
17.04.2015 смотреть >> Моё второе интервью!
Моё второе интервью!
http://handmade-europe. com/2013/03/22/friday-is-my-day-eja-ejovna/ Friday is my day: Eja Ejovna by karuski on March 22, 2013 in Featured sellers, Friday is my day Dear readers, Today’s Friday post is the last one from me, Tatiana from ILaBoom will hop in so fear not, these beautiful features will continue for sure. I’m happy to introduce you Nuta from Eja Ejovna who crochets some of the sweetest accessories! teething crocheted necklace by EjaEjovna Hi! My name is Anna, but my mommy calls me Nuta, and I like it *smile*. I live in Ukraine in a beautiful city of Kharkov, with my husband, son and catty. I have loved handmade things all my life, but only when was born my son I discovered my love to crochet and knit. I make things that are natural jewelry for mom and natural toy for little ones, and beautiful elegant jewelry for everyday wearing. I begin my day by visual inspirations from my family, nature and my little son! He is my big and happy inspiration in all my life! I wake up at 9 AM. By this time my hubby has already gone to work, so that’s why I’m with my son to take breakfast. Then I go to the computer and check my e-mails, Etsy shop etc. Then we run to go outside. Usually our walk takes 1. 5 - 2 hours. We live not so far from the airport and every day we go to look airplanes and walk with our friends. Today is a beautiful sunny day! Around 1 - 2 PM we eat and then I start to work. As usually I draw on paper how the final piece will look, select colors and yarns. I start to crochet with all my love to this. One necklace takes me 1 - 2 days. Then I work with custom orders or go to the post office. At 5 - 6 PM our daddy comes home and we spend the evening together. I believe in making individual jewelry for moms and babies to enjoy every day and have fun together, for women and girls to feel beautiful by wearing them every day! Eja Ejovna’s Etsy shop
22.03.2013 смотреть >>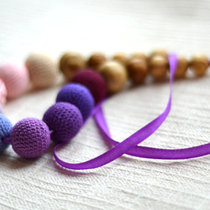 Моё второе интервью!
Моё второе интервью!
http://handmade-europe. com/2013/03/22/friday-is-my-day-eja-ejovna/ Friday is my day: Eja Ejovna by karuski on March 22, 2013 in Featured sellers, Friday is my day Dear readers, Today’s Friday post is the last one from me, Tatiana from ILaBoom will hop in so fear not, these beautiful features will continue for sure. I’m happy to introduce you Nuta from Eja Ejovna who crochets some of the sweetest accessories! teething crocheted necklace by EjaEjovna Hi! My name is Anna, but my mommy calls me Nuta, and I like it *smile*. I live in Ukraine in a beautiful city of Kharkov, with my husband, son and catty. I have loved handmade things all my life, but only when was born my son I discovered my love to crochet and knit. I make things that are natural jewelry for mom and natural toy for little ones, and beautiful elegant jewelry for everyday wearing. I begin my day by visual inspirations from my family, nature and my little son! He is my big and happy inspiration in all my life! I wake up at 9 AM. By this time my hubby has already gone to work, so that’s why I’m with my son to take breakfast. Then I go to the computer and check my e-mails, Etsy shop etc. Then we run to go outside. Usually our walk takes 1. 5 - 2 hours. We live not so far from the airport and every day we go to look airplanes and walk with our friends. Today is a beautiful sunny day! Around 1 - 2 PM we eat and then I start to work. As usually I draw on paper how the final piece will look, select colors and yarns. I start to crochet with all my love to this. One necklace takes me 1 - 2 days. Then I work with custom orders or go to the post office. At 5 - 6 PM our daddy comes home and we spend the evening together. I believe in making individual jewelry for moms and babies to enjoy every day and have fun together, for women and girls to feel beautiful by wearing them every day! Eja Ejovna’s Etsy shop
22.03.2013 смотреть >> Моё первое интервью!
Моё первое интервью!
http://dlitesbydorene. blogspot. com/2013/03/etsy-shop-review-nuta-orlova-of. html Sunday, March 3, 2013 Etsy shop review - Nuta Orlova of EjaEjovna Every other Sunday, I am pleased to introduce an artist who sells on Etsy and his/her shop. Today's artist is Nuta Orlova, from the Ukraine, and her shop EjaEjovna. Please read more about her and her inspiration. Hi, my name is Anna, also known as Nuta. I was born and now live in Ukraine in beautiful city Kharkov with my husband, son and cat. I make colorful, elegant and natural jewelry. Initial Jewelry I have loved handmade things all my life, but only when my son was born I discovered my love to crochet and knit. At first I prepared presents for my parents, friends and my son. Then I wanted to develop my skills! Some time ago I decided to open this shop! I like to experiment. I create under a pseudonym "Eja Ejovna" :))). . . Red Nursing Necklace My nursing necklaces are totally natural necklaces, a must-have for every mom or just for those who loves nature and everything natural. I make these beads with covering wooden beads with a cotton yarn or linen yarn and lots of love :) Blue Nursing Necklace Other my jewelry is simple elegant and lovely. Perfect for everyday wearing. Vintage Style Skeleton Key Necklace I begin my day by visual inspirations from my family, nature and piece in my heart. It is difficult to say what exactly gives me creativity. J I'm happy to be a wife and a mom. I spend all time with my son (he is 3 years). I`m a housewife. I love to embroider, play the piano, and draw. My hobby is taking photography. Vintage style blue headband I love all my items. All my jewelries made in single copies. But one of my favorite items which I most proud of is: Knit and crochet nursing necklace You can also find my products here: http://www. etsy. com/shop/EjaEjovna http://wanelo. com/nuta http://pinterest. com/yanuta https://twitter. com/YaNutata
03.03.2013 смотреть >> Моё первое интервью!
Моё первое интервью!
http://dlitesbydorene. blogspot. com/2013/03/etsy-shop-review-nuta-orlova-of. html Sunday, March 3, 2013 Etsy shop review - Nuta Orlova of EjaEjovna Every other Sunday, I am pleased to introduce an artist who sells on Etsy and his/her shop. Today's artist is Nuta Orlova, from the Ukraine, and her shop EjaEjovna. Please read more about her and her inspiration. Hi, my name is Anna, also known as Nuta. I was born and now live in Ukraine in beautiful city Kharkov with my husband, son and cat. I make colorful, elegant and natural jewelry. Initial Jewelry I have loved handmade things all my life, but only when my son was born I discovered my love to crochet and knit. At first I prepared presents for my parents, friends and my son. Then I wanted to develop my skills! Some time ago I decided to open this shop! I like to experiment. I create under a pseudonym "Eja Ejovna" :))). . . Red Nursing Necklace My nursing necklaces are totally natural necklaces, a must-have for every mom or just for those who loves nature and everything natural. I make these beads with covering wooden beads with a cotton yarn or linen yarn and lots of love :) Blue Nursing Necklace Other my jewelry is simple elegant and lovely. Perfect for everyday wearing. Vintage Style Skeleton Key Necklace I begin my day by visual inspirations from my family, nature and piece in my heart. It is difficult to say what exactly gives me creativity. J I'm happy to be a wife and a mom. I spend all time with my son (he is 3 years). I`m a housewife. I love to embroider, play the piano, and draw. My hobby is taking photography. Vintage style blue headband I love all my items. All my jewelries made in single copies. But one of my favorite items which I most proud of is: Knit and crochet nursing necklace You can also find my products here: http://www. etsy. com/shop/EjaEjovna http://wanelo. com/nuta http://pinterest. com/yanuta https://twitter. com/YaNutata
03.03.2013 смотреть >>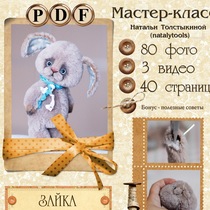 Розыгрыш вконтакте / Giveaway
Розыгрыш вконтакте / Giveaway
РОЗЫГРЫШ полного набора по изготовлению зайчика-Снежинки!!! (ВКОНТАКТЕ!) Для того, чтобы принять участие в розыгрыше, нужно: 1) Быть участником группы https://vk. com/mk_natalytools 2) Пройти по ссылке и проголосовать за котика)) http://www. livemaster. ru/item/14271949-kukly-igrushki. . 3) сделать репост этой записи у себя на открытой неконфетной странице 4) после выполнения всех условий написать комментарий на странице ВК https://vk. com/mk_natalytools?w=wall-73889515_49 - ГОТОВО! (розыгрыш будет только среди оставивших комментарий и выполнивших все условия конфеты). Победитель будет выбран 30 марта 2016г. и он получит ПОЛНЫЙ набор для изготовления зайчика- все материалы (пушистая вискоза, стеклянные глазки, шплинты, шайбы, диски, нитки и т. п. ) + подробнейший пошаговый мастер-класс с выкройкой, фото и видео процесса. Участвующим в розыгрыше желательно иметь хотя бы небольшой опыт в создании игрушек и иметь представление о технологии тедди. Удачи всем!!! GIVEAWAY --- full set for the create of bunny !!! To join into this Giveaway, you need to: 1) be a member of https://vk. com/mk_natalytools 2) Go to the link and vote for the seal)) http://www. livemaster. ru/item/14271949-kukly-igrushki. . 3) do repost this record at the open page at the VK-site ✨4) after fulfillment of all conditions to write a comment at page below- READY! (Draw will only include comments and fulfilled all the conditions of candy). https://vk. com/mk_natalytools?w=wall-73889515_49 The winner will be chosen on March 30th 2016. and he will set Full for manufacturing bunny- all materials (downy viscose, glass eyes, cotter pins, washers, discs, threads, etc. ) + detailed step by step master class with patterns, pictures and videos of the process. Participating in the drawing, it is desirable to have at least some experience in the creation of toys. Good luck to everyone!!!
20.03.2016 смотреть >>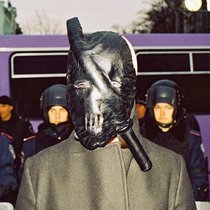 Bob Basset for Hromadske. tv
Bob Basset for Hromadske. tv
English: This mask symbolizes a police baton spread over the face from a blow thus making it impossible to see and to speak. It was created a day or two after beating peaceful demonstrators and journalists in Kiev. Thanks to these Journalists, to their hard work and blood they have poured I was able to see these terrible events, to draw my own conclusions about the situation in Ukraine and to distinguish good from bad. And this is the reason why I want to support them. Unfortunately a truly independent journalism is almost disappeared in Ukraine. Hromadske. tv – is one of the last outposts. And all the money received from the sale of this mask I will transfer to them. Russian: Маска символизирует милицейскую дубинку, растёкшуюся по лицу от удара. Тем самым лишив человека возможности видеть и говорить. Эта маска была придумана, и сделана после инцидента избиения мирных демонстрантов и журналистов в Киеве. Благодаря тем Журналистам, я смог увидеть всю картину целиком, и сделать свои собственные выводы о происходящем. Теперь чувствую себя обязанным этим людям. За то что на примере их труда, и пролитой крови, я могу отличить дурное от хорошего. К сожалению островов действительно независимой журналистки в Украине почти не осталось. hromadsketv один из последних форпостов. Все деньги от продажи этой маски я передам им. Ukrainian: Маска символізує міліцейський кийок, що розпластався по обличчю від удару. Тим самим позбавивши людину можливості бачити та говорити. Ця маска була придумана, і зроблена після інциденту побиття мирних демонстрантів, та журналістів у місті Києві. Завдяки тим Журналістам, я зміг побачити всю картину цілком, і зробити свої власні висновки про події у нашій крїні. Тепер відчуваю себе зобов’язаним тим людям. За те що на прикладі їх праці, та пролитої крові, я можу відрізнити погане від доброго. Нажаль, островів дійсно незалежної журналістки в Україні майже не залишилося. hromadske. tv один з останніх форпостів. Тому всі гроші від продажу цієї маски я передам ім. Click on photo for auction: That mask was featured on “Dazed and Confused Magazine” site Especial project by Daria Shapovalova, Kati Garbuz Photo by Sasha Kurmaz
26.12.2013 смотреть >>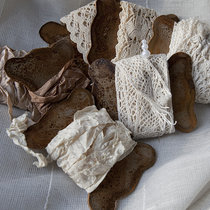 Tutorial 'Vintage Tape Reel'
Tutorial 'Vintage Tape Reel'
Небольшой МК "Винтажные бобины для кружев и лент". Small tutorial 'Vintage Tape Reel' Если вам, как и мне, нравится старить все подряд в кофе, то, надеюсь, вам понравится очередной "рецепт". If you like to make vintage things with coffee, I hope you'll like this "recipe". Для начала рисуем шаблон и обводим его необходимое количество раз на любом картоне. Потом вырезаем, разводим "раствор" и начинаем красить. For start we should draw a template required number of times on any cardboard. Then cut out, make a 'liquor' and start painting. В этом случае я бы посоветовала все-таки применить кисть, потому что от большого количества воды картон может начать размокать. Плюс вы сможете регулировать интенсивность цвета. В первый раз я сделала наоборот и всю "партию" пришлось спасать. This time I advise to use a brush, because water can steep the cardboard. And you can adjust the color intensity. Чтобы добиться вот таких вот "точек", посыпаем на мокрый картон кофе прицельно. Если, попав на заготовку, кофе не начинает растворяться, значит влаги недостаточно. Можно помочь, взяв на кисточку и капнув сверху нашим кофейным раствором. To make such spots, you should sprinkle wet cardboard with coffee granules. If coffee doesn't begins to dissolve, your cardboard should be more wet. На этом же этапе можно немного поиграться и со спреями и штампами. Например, сделать "оттиск" рукописного шрифта. Или создать эффект кирпичной стены, взяв в качестве трафарета чипборд. At this step you can work with sprays and stamps. For example, stamp of the written script. Or create the effect of a brick wall, taking the chipboard. Что делаем дальше? Берем и покрываем заготовки лаком, чтобы они потом не покрасили хранящиеся на них ленты и кружева (у меня он матовый и в виде спрея): Then you should cover our tape reel with lacquer (I have matted lacquer in a spray): После засыхания лака, обрабатываем края мелкой наждачкой, красим их акриловой краской (можно, кстати, не делать это аккуратно. Избыток краски можно пальцами растянуть и втереть в заготовку. Если даже краска светло-коричневого цвета, будет очень хорошо). Ну, и еще раз покрываем лаком. И вот, что у нас получается: When lacquer were dry, treat our tape reel, paint them with acrylic paint. You can stretch excess paint with your fingers and rub it into the workpiece. Better if your paint would be light brown color). Well, once again cover with lacquer. And that's what we have: Наматываем ленты: With ribbons and lace: Вот и все :) That's all :)
21.11.2012 смотреть >>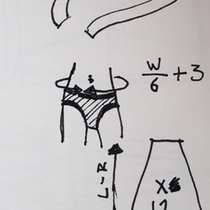 "victorian" skirt how to
"victorian" skirt how to
Оригинал взят у learningtoflylj в "victorian" skirt how to Hello, I am totally new to this community, but I was asked over at diy_tutorials if I could post it over here to :) How to sew a two in one "Victorian" skirt So I thought that I would share my how to for this quite easy sewn skirt in taffeta that I made for a friend of mine, it is a two layer skirt with strings so that you can tie up and drape the panels as you wish. This is a bit simplified, On the original skirt the top of the skirt was lined with satin so it was not completed in the exact same way as in this tutorial, but trying to explain that whole deal was to time consuming to be worth it. Material you will need: Fabric: Of your choice, around 2 times the length of your skirt A zipper: I use a hidden zipper because I think it looks better, but a ordinary one is just as good. String: The length of your drapes and a little more *2*6 (you chose one can both have it the whole way up on the skirt or just half, or something similar) I use cotton string 0, 5 cm (0, 2 inches) thick. 1 The pattern is a really easy one, it consist of 12 panels and then a long rectangle that is the ruffles. The fist thing you have to do is calculate your panel pieces, this is done like this. You measure were you want the skirt to sit. Then take that measurement and divide it with six, (the number of panels that goes into making one of the layers). Then add your sewing allowance to that number, I use 1, 5 cm (0, 6 inches) on each side so I simply add 3 cm. (1, 2 inches) A slightly larger sewing allowance is preferred since we are using it for the channels to the strings later. Now you have the number of the top of your panel. Now take the measurement on how long you want the whole skirt to be - the length of your ruffle (you decide the length yourself, my ruffle were approximately 18 cm (7, 1 inches) ), this is how you get the length of your panels. You can chose how wide your skirt is now, I usually use the width of the fabric to decide this, so that when the fabric is folded double I can put three panels beside each other and that way get six pieces when I cut it. (see next picture) To calculate this you take the width of the fabric folded double - the top of the panels measurement divided in two. This number is the width on the bottom of your panel. 2 Now it is time to lay out your pieces, I pain directly on the fabric with a fabric pen, but you can cut the panels into paper pieces if you want to. But I find it easier to just draw on the fabric. The pieces for the overskirt should be cut approximately 7 cm (2, 8 inches) shorter then the underskirt pieces. For the width of the ruffle pieces I use the width of the fabric one again, how long they are is up to you. I use four rectangles the width of the fabric to make the ruffles on one layer of the skirt. Cut your pieces out you will not have 12 panel pieces, with six pieces of them being shorter then the other six and eight ruffle pieces that are identical to each other. Beside you, you will also have your sipper and all the string that you need. Lets start sewing. 3 Zig zag all around your pieces or overlock them if you have the ability to use the serger. Put the pieces in piles, one for the overskirt (the six shorter panel pieces and four of the ruffle pieces) and one for the underskirt (the six longer panel pieces and four of the ruffle pieces) 4 We are staring with the overskirt, the first thing we do is to attach the zipper. To two of the shorter panels. 5 Then you attach the rest of the pieces to each other good sides together, but do not sew the last panels together. It makes the next two steps easier. 6 Iron your sewing allowance apart. 7 Now we are doing the channels, Simply sew 1 cm (0, 4 inches) from the seam keeping the panels together to create the channels. Do this on all pieces, and so that you have one channel on each side of our panels. Then sew the last panels together, iron the seam allowance flat and do the channels just as you did the other channels. 8 Turn the skirt so that you have the seam allowances on the inside. You will now have 12 channels if you have made it correctly. 9 Sew the four ruffle pieces together, and iron the seam allowance flat. 10 Fold over 1 cm (0, 4 inches) and hem the bottom of the ruffle 11 Sew a gathering seam at the top of your ruffle, I use my machine set on the longest straight seam that I can use, but this can be made by hand to. 12 To make the ruffles even, put pins with all the same length between them at four places on the bottom of the skirt. The ruffle is already conveniently marked on four places by the seams. 13 Now attach the ruffle piece to the skirt at these four places, (remember: the pretty sides to the pretty sides of the fabrics). Then by pulling the end of the ruffle seam, make ruffles and pin them as you go along. 14 Sew the ruffles to the skirt. 15 See, nice ruffles you have now. 16 Now is the time to cut your strings, The sting is supposed to be twice the length of your drapes plus bit more. Cut six pieces. 17 If you want to make a skirt that you can drape a bustle with, I suggest that you have long drapes. 18 Thread a blunt needle with your string and pierce the top fabric of a channel. It should not go though to the front of the skirt. Then pull the string through the channel as long as you want the drape to be and then pierce the channel again, jump over the seam that connects the two panels and pierce the channel again. Pull the string trough the cannel back don to the ruffle again and pierce the channel again. Trim the edges of the string and knot the ends so they don’t disappear into the channels. Do this with all the strings. 19 The ends of strings should not be longer then the ruffles, this way they are not seen at all. 20 Now the overskirt is done! 21 Now repeat step 5 to 16 but with these exceptions: In step 5: in stead of inserting a zipper, sew the channels together but only up to the pint were the zipper should have been. In step 6: do sew the last channels together. Ignore step 8 and 9. Now you will have one overskirt, and one slightly longer underskirt. 22 Now put the skits tighter as they should be, the overskirt over the underskirt. Fold in the seam allowance at the opening for the zipper on the underskirt and fold down together the top of the under and overskirt and hem it 1, 5 cm (0, 6 inches) in. Hand sew the opening for the zipper on the underskirt to the overskirt to make it look neat. Then your skirt is officially finished. :D To show of the poof this skirt could need some underskirts or a simple one hoop crinoline. Under the skirt in the picture in the top is a crinoline, the crinoline is sewn as a simple skirt with the only difference is that there is steel boning in the bottom hem. As you see here, one can make both long and short skirts this way, in this skirt I in bridal satin, and have two layers ruffles on the underskirt, the ruffles are also shorter on this skirt. Good luck with your project.
14.02.2014 смотреть >>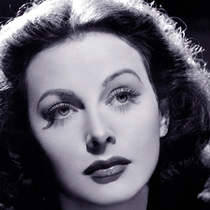 Corel. Плагиат. Художник Алексей Оглушевич – творческий жулик и прохиндей.
Corel. Плагиат. Художник Алексей Оглушевич – творческий жулик и прохиндей.
В этот раз повествование начнётся издалека. Заглавное фото это Heddy Lamarr (Хедди Ламар) удивительная и уникальная женщина. Тот, кто не знает кто она, настоятельно рекомендуется прогуглить. Помимо того, что это первая актриса первого официального эротического фильма в истории кино, она еще и изобретатель того вида связи, который сейчас используется в мобильниках. И по странному стечению обстоятельств, она же сумела выиграть судебный процесс по защите авторских прав у корпорации Corel. Это случилось, тогда, когда обложки всех продуктов этого софтверного гиганта внезапно украсились её портретом в векторном формате. Как не странно, но повадки у Corel нисколько не изменились с тех пор. Об этом и данный материал. Брюллов. Этот тот мастер, которой для автора сих строк есть предельное достижение мировой живописи. В области техничности. После Карла Брюллова живопись деградировала, но ни в одном случае не поднялась до его уровня. Именно потому автор, со всем почитанием, несколько раз попытался расшифровать его световые схемы. В том числе - самую загадочную, которая отражена в картине «Итальянский полдень». Результатом стала съёмка, в которой и находится знаменитая работа - римейк итальянского утра. Особо отмечается, что задача абсолютно повторить знаменитое живописное полотно не ставилась, но было желание создать аналогичное по духу и технике освещение, что и было успешно выполнено. Фотография эта была встречена «горе критиками» неоднозначно. Наиболее часто встречаемое замечание касалось комплекции модели. Убогие «критики» возмущались худобой модели. Комичность ситуации в том, что когда Брюллов явил «Итальянский полдень» критики возмущались излишней полнотой модели. Воистину, что лузеру вдалбливается в его пустую голову - о том он и вещает. Профессионал же, наоборот, интересуется технологиями и обдумывает, как эти технологии монетаризировать. Вот далее речь пойдёт именно о таком «профессионале». Имя его - художник Алексей Оглушевич. И специализируется Алексей Оглушевич на векторной графике, которую вершит в программе Corel Draw. Далее - много материала про плагиат, потому под спойлер идут только те, кому это интересно. Художник Алексей Оглушевич это настоящий профессионал, он нашёл фото автора, и, судя по всему, решил применить его для непосредственного заработка. А точнее - как картинку для этикетки алкогольного напитка Osoyoos Larose. И, всё может быть прошло незамеченным, но удача ему вскружила голову и помутнила разум. А это уже непрофессионально! И понесло художника Алексея Оглушевича во все тяжкие! Сначала он выставил эту работу на конкурс Corel. А Corel, верный своим повадкам лепить плагиат, не проверил чистоту картинки. И выдал соискателю премию. А этот плагиатор еще и создал на основе всего аж два мастрер-класса! Вот какой герой! И в каждом мастер-классе он показывает, как героически трудится, создавая картину от своего, понятно, лица и авторства! Ну, что поделать - все герои, и все при деле. Вот только есть одно, очень задевающее реального автора данного изображения, обстоятельство. Это то, что в оригинале лицо намного более красивое, чем то, которое наваял этот горе-художник. И здесь автор и владелец сильно возмущен. НО - всему своё время, быть может это еще и найдёт свое решение - главное начать! Далее - даже видео!
29.11.2017 смотреть >>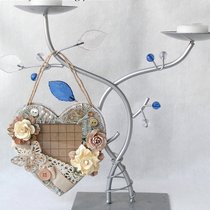 "Рамка-валентинка"
"Рамка-валентинка"
В блоге Altered Art, где я являюсь дизайнером, стартовало первое экспресс задание (сроком на неделю) - "Рамка-валентинка", по моему мастер-классу!!!))) Обязательно поучаствуйте, там и приз разыгрывается замечательный!!!))) В преддверии дня Святого Валентина, хочу вам предложить сделать вот такую рамку-валентинку для любимого человека. On the eve of St. Valentine's day I suggest you to create a Valentine-frame for your loved one. Для проекта нам понадобятся: - карандаш, ножницы, линейка - бумага 2-х сочетающихся дизайнов - акварельная бумага (либо любая другая, но достаточно плотная) - пластик для окошка (необязательно) - швейная машинка - шнур (либо лента, либо что угодно, на чем будет держаться ваша рамка) - белая акриловая краска (необязательно) - кружево, ленты, цветы, пуговицы, акриловые капли, полубусины, дыроколы (все, что будете использовать для декора рамки) Итак, приступим) For this project we'll need: - a pencil, scissors and a ruler - paper of two matching patterns - watercolor paper (paper for pastels or any other type of thick paper) - acetate for the window (optional) - sewing machine - cord (or ribbon, or any other trim or fiber which will hold your frame) - white acrylic paint (optional) - lace, ribbons, flowers, buttons, gems, pearls, punches (anything you can use to decorate your frame) Ok, let's begin! :) На фоновой бумаге рисуем карандашом сердечко и ножницами вырезаем его. Прикладываем к лицевой бумаге и обводим на сантиметр побольше. Вырезаем. Не стремитесь к идеально ровному краю, здесь он неактуален (касается только большого сердечка). У нас получается 2 фигуры, побольше и поменьше. Take the background paper and draw a heart shape with a pencil, cut it out with scissors. Place it on the paper you chose to be exterior, and outline the shape of the heart leaving about 1 cm (2/5") margins between the shape and your line. Cut it out. Don't try to make a perfect edge too hard, it's not that important for the bigger heart. So we have two hearts: a bigger one and a smaller one. Далее берем лист более плотной бумаги (акварельной, например), обводим наше маленькое сердечко на нем и вырезаем на 0, 5 см меньше намеченного контура. Карандашом намечаем окошко для будущего фото и вырезаем его. Then take a sheet of thick paper (paper for watercolor for instance). Outline the smaller heart, and cut a shape which is 0, 5 cm smaller than the outline. Mark the place where you want a window for photo to be. And cut it out. От души "жамкаем" в руках наше большое сердечко и приклеиваем его в нескольких местах по контуру к сердечку с окошком. Прошиваем по контуру фигуры и окошка на швейной машинке, чуть отступив от края. Вырезаем окошко из "жамканной" бумажки, обрезаем лишнее по краям, примеряем к фоновому сердечку и любуемся красотой! Crimple, crumple and wrinkle the bigger heart as much as you like and adhere it to the heart with a window with a few glue dots close to the edge. Use your sewing machine to stitch along the outline and the window. Cut the window in the crimpled paper, cut the excess off, and try to fit this heart upon the background one. Enjoy the beauty of the moment :) Если у вас есть тонкий пластик, например упаковка от чего-либо, вырезаем из него прямоугольничек чуть больше вашего окошка и аккуратно приклеиваем его изнутри окошка по контуру. Дальше приклеиваем шнурок, на котором будет держаться рамка, его концы должны располагаться чуть дальше от центра, чем боковые стороны вашего окошка. Склеиваем между собой оба сердца, оставляя нетронутым расстояние между концами шнурка, здесь мы будем вставлять фото. Далее декорируем по вашему усмотрению и назначению))) Я прошлась по всем замятинам и контурам белой акриловой краской, для придания потрепанности. . . Не забудьте до склеивания элементов завести вовнутрь все концы лент, при необходимости. . . If you have a piece of an acetate (it could be left from some kind of a package), cut a rectangular out of it - a little bigger than the window in the heart. And carefully adhere it to the edges of the window on the back of the heart. Then adhere the cord which will hold the frame; its ends should be placed outside the photo window. Glue both hearts to each other, but be sure not to apply any glue between the cord ends - you'll need that space to insert the photo later. The next step is decoration - do it any way you like. :) I brushed all the crimples and contours with white acrylic paint to make it look a little distressed. And don't forget to tuck all the ribbon/fiber/cord ends between the hearts before glueing them together (if it's necessary). Радуйте своих родных и близких вашими сердцами))) Make your loved ones happy with your hearts :) С любовью, Tanya_Flower ♥ with love, Tanya_Flower ♥ За перевод огромное спасибо Алене !!! А я в свою очередь поучаствую с этим сердечком в заданиях: "Шебби-Шик" от блога Скрап без границ "Необычная валентинка" по заданию блога Скрапбукинг в Уфе! "Я тебя люблю" от Good Hobby "Палитра" от StudioScrap И в иностранных: Challenge 16 - Love is. . . by Wild Orchid Challenge. Charisma Cardz Challenges - Challenge #4 - Valentines / Love Paper Sundaes Challenge #54: Valentine's
01.02.2011 смотреть >>