thing
 soft and hard
soft and hard
How to fight loneliness Smile all the time Shine you teeth til meaningless Sharpen them with lies And whatevers going down Will follow you around Thats how you fight loneliness You laugh at every joke Drag your blanket blindly Fill your heart with smoke And the first thing that you want Will be the last thing you ever need Thats how you fight it Just smile all the time Just smile all the time Just smile all the time Just smile all the time (с) Wilco - How To Fight Loneliness
04.02.2010 смотреть >> He’s with me. He’s, uh… Uncle Bob. - Uncle Bob, eh? Okay…
He’s with me. He’s, uh… Uncle Bob. - Uncle Bob, eh? Okay…
Сегодня я наконец узнала, в чём было дело. Вот как-то так, да. И "дядя Боб". - And that’s another thing. You can lighten up a bit yourself. This severe routine is gettin’ kinda old. You’re acting like such a geek. Smile once in a while. - Smile? - Yeah. - That’s good… Maybe you could practice in front of a mirror or something…
04.11.2015 смотреть >>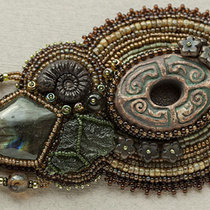 Wild thing
Wild thing
и еще одна вещь с влтавином, но куда более дикая и хищная Она нашла владельца еще практически до рождения, и это - лучший владелец для неё. И, как легко заметить, к ней тоже приложил руку камрад и соавтор - неутомимая osting Влтавин, лабрадор, керамика, чешское стекло, чешский и японский бисер.
15.06.2013 смотреть >>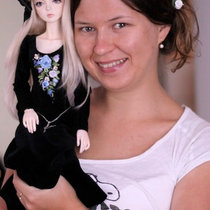 Ф-моб
Ф-моб
Ф-моб
Привет! Чем бы дитя не тешилось На фликре и дайри бждшники увлечённо играют в новый флэшмоб :-) Спасибо gotikiska, у меня тоже есть повод засветиться :-)) Муж щёлкнул перед выходом на улицу. 1 - Take a picture of your doll and you NOW! 2 - You can not change her/his clothes or comb her/his hair! 3 - If she/he is without eyelashes or chips, she will have to be the same, without! Wig is the same thing! 4 - Do not edit or photoshop! Только без редактирования не дождётесь, ага. Хотя тут Апертюра, а не Фотошоп 5 - Tag five friends (понятия не имею, сколько в ЖЖ бждшников, которые ещё не успели показаться - так что берите кто хочет)
27.06.2012 смотреть >> Altered frame
Altered frame
Хоть изредка, но я делаю что-то и для себя :) Вернее, для семьи. Как-то свекры пожаловались, что у них нет ни одной Янкиной фотографии. Вот, исправляюсь :) Sometimes I'm doing thing for myself :) Rather, for the family. Mother-in-law complained that they do not have any Jan's photos. My fault! Основа для этой своеобразной рамочки - самый первый бодик. Кроме того, использовала бумагу MF, вырубку K&Co, хольцевскую подушечку и кракелюр, полубусины, кружево и чипборд-буквы. I made this frame from the first bodysuit, MF paper, K&Co, Tim Holtz pad and craquelure, halfperls, lace and chipboard letters. Спасибо, что зашли! Thank's for coming!
04.12.2012 смотреть >>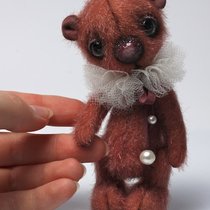 Мьетта
Мьетта
Привет :-) Вот наконец и Мьетта :-) Если верить справочникам имён, её имя означает "The little sweet thing", вот. А ещё мне до сих пор так забавно, фотографии мишек на конкурс TED Worldwide нужно было послать почти за полгода до самого конкурса. . . Так что мишки-участники сидят у меня дома уже очень давно, и только сейчас я их показываю :-) Да и сам конкурс забавный, по крайней мере для меня. Награда за успехи полугодовой давности :-)) Мне кажется, сейчас я умею гораздо больше :-) Мьетта сшита из Sparse long pile, размер 11 см, умеет стоять сама :-) Мьетта ищет новый дом на Ebay :-) Удачи!
22.03.2011 смотреть >>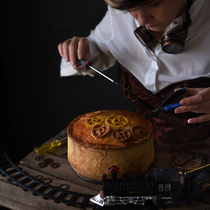 Raised Game Pie – medieval recipe
Raised Game Pie – medieval recipe
Originally published at Yellow Chimney. Please leave any comments there. I could never really resist old or vintage recipes. Any recipe marked as “Granny’s” or “Traditional Family” buys me at once. How do you think I felt when I found this MEDIEVAL recipe on http://yellowchimney. com/ReallyNiceRecipes. com. I lost my breath and immediately filled my shopping basket (I do shop online, yes) with pheasants and venison. Cooking process is a killer, honestly. It’s unbelievably long. The only thing that makes it bearable is that of those 30 hours you spend only about 2 hours hands on… Still – that’s definitely not the things you want to starts when guests knock at the door. Recipe: (serves 20, cooking time 1 h 20 mins for the pie, 2 h for the stock) Read the rest of this entry »
01.02.2016 смотреть >>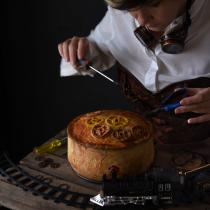 Raised Game Pie – medieval recipe
Raised Game Pie – medieval recipe
Originally published at Yellow Chimney. Please leave any comments there. I could never really resist old or vintage recipes. Any recipe marked as “Granny’s” or “Traditional Family” buys me at once. How do you think I felt when I found this MEDIEVAL recipe on http://yellowchimney. com/ReallyNiceRecipes. com. I lost my breath and immediately filled my shopping basket (I do shop online, yes) with pheasants and venison. Cooking process is a killer, honestly. It’s unbelievably long. The only thing that makes it bearable is that of those 30 hours you spend only about 2 hours hands on… Still – that’s definitely not the things you want to starts when guests knock at the door. Recipe: (serves 20, cooking time 1 h 20 mins for the pie, 2 h for the stock) Read the rest of this entry »
01.02.2016 смотреть >>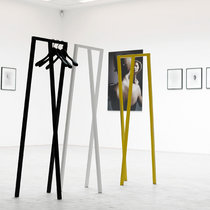 hallelujah
hallelujah
нашла вещь, в которой нуждалась года 2 не могла придумать, нарисовать, облечь в форму то, что мне было нужно. мне нужна была белая стоячая буква П, но как мы знаем такие тонкие конструкции просто так не стоят, а с весом тем более ну и гуглила я очевидно тоже вовсе не то и вот, сегодня, вуаля! она меня нашла надеюсь, что скоро мы воссоеденимся Loop Stand Hall (хочу белую) была создана для оформления интерьера магазина Storm в Копенгагене. Вариации на тему вешалок-деревьев: XX coat rack by josh owen Mario Mazzer Tree Coat Stand Tree Coat Stand Designer: Michael Young and Katrin Petursdottir Nava - Tree Clothes Stand Alberto clotheshorse - Casamania by Frezza Ну и моя любимая by Magis
13.05.2010 смотреть >> thin moire. . .
thin moire. . .
стиль A*Zhukova фотограф Андрей Годяйкин ichich модели Ольга lili_lel, Полина Крикун.
19.05.2012 смотреть >>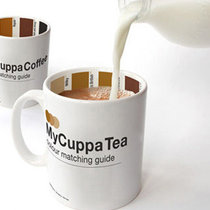 Любителям кофе
Любителям кофе
отсюда http://geniusbeauty. com/gift-ideas/24-ingenious-ideas-coffee-mugs/#bookmarks Here are 24 great ideas of coffee mugs design you will definitely like. Some of them can be really good gift ideas, while others look just so great that you will want to have them for yourself. Enjoy and choose the one you like most! Like Strong Coffee? Is it a mug or a weapon? At least you can get a good grip on it. Punch coffee mug is a masterly thing! Keep Everything Home Here’s a dunk mug - a mug with a convenient ceramic basement for your food stores. A Camera Drink You can almost make the one like that yourself dismantling your camera. Doesn’t it look stunning? A Present from Your Granny It certainly looks as if your favorite old relative knitted this cup for your Christmas present! Nuclear Associations for Power Fans This set is a pretty close imitation of a nuclear power plant. Let it smoke and feel the power. The Cup That Says When For those who like to have exactly 1/3 milk in their coffee - no mistake guaranteed with this Cortado mug. Let It Drown The cup is covered with a layer of heat sensitive dye that goes up to cover the iceberg when you pour in a hot drink. Is It One or Three? While your guests wonder how you manage it, you have quite a comfy drink no matter what handle you are using. New Relations between Old Friends Now you can have the saucer where you think it will look better. Or maybe it’s no longer a saucer? Exactly, it’s a great To Go cup. Help at a Glance Now this is really useful. Checking against the color guide on the inside of the mug you can see how far you are going with the ingredients. Shot Down by Coffee You can literally trigger off the energy beverage into your system. All automatic. Wear Your Taste on Your Mug Twist the rings on the mug to show your drink and your preferences instead of speaking out loud. Let your mug provide full and unmistakable service! A Tell-Tale Cup Do you think it looks a bit ordinary? It does - until you fill it up. At once it changes its color and the legend to tell you that the party is ON! Join Me in a Drink You can link your cup now to another one… actually, to as many as five other cups… with a cute cross on the side. For company lovers as well as for those who like their drink to be a long one. Almost Used up, but Good for a While Yet! Don’t let this ceramic imitation fool you. It’s not real crinkled plastic! You may be disappointed and you may like it. Make sure to explain it to others before you hand it over! For Good Mood First Thing in the Morning Get your favorite drink served with a smile. Tea Bag Disposable Bury your tea bag corpse under the cup where you find a ready-made grave for it. Handy and tidy are the words. Me Cup - Just Comfort It has more features than any other cup! The empty chambers in the walls prevent you from getting your fingers burned while your beverage is hot. The saucer will have your cup firmly fixed as long as you want it this way, and will easily turn into a sealing lid to keep the heat inside. 100 % effective! A Breakfast Table Statue to Darth Vader Who could have imagined that those good old Dark Lords were also fond of coffee ? When Helpers Are Painted On This is a mug that will never drip down on things! Get a Drink from Anamorphic Cylinders An ages-old visual trick restored for those who want to read what is printed onto their porcelain saucers. These steel cups provide a good mirror effect with the inscription carefully made to be turned into neat calligraphics. The Drinker Has Been Warned In order not to read this pessimistic message you will probably have to refrain from drinking from the cup at all. Font Guide on Nothing like the proper-colored Helvetica for explaining you to a T what exactly you are about to drink. True to font and to drink alike. Snuggly and Highly Holdable This mug is designed especially to bring the center of gravity closer to your hand. There are different ways to hold it allowing you to pick a perfect fit. And at the same time it is pleasant to the eye. Will you choose this one for a winner? Source of the images: toxel. com, despair. com
05.11.2011 смотреть >>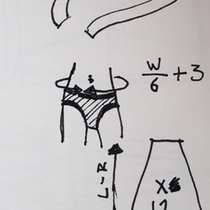 "victorian" skirt how to
"victorian" skirt how to
Оригинал взят у learningtoflylj в "victorian" skirt how to Hello, I am totally new to this community, but I was asked over at diy_tutorials if I could post it over here to :) How to sew a two in one "Victorian" skirt So I thought that I would share my how to for this quite easy sewn skirt in taffeta that I made for a friend of mine, it is a two layer skirt with strings so that you can tie up and drape the panels as you wish. This is a bit simplified, On the original skirt the top of the skirt was lined with satin so it was not completed in the exact same way as in this tutorial, but trying to explain that whole deal was to time consuming to be worth it. Material you will need: Fabric: Of your choice, around 2 times the length of your skirt A zipper: I use a hidden zipper because I think it looks better, but a ordinary one is just as good. String: The length of your drapes and a little more *2*6 (you chose one can both have it the whole way up on the skirt or just half, or something similar) I use cotton string 0, 5 cm (0, 2 inches) thick. 1 The pattern is a really easy one, it consist of 12 panels and then a long rectangle that is the ruffles. The fist thing you have to do is calculate your panel pieces, this is done like this. You measure were you want the skirt to sit. Then take that measurement and divide it with six, (the number of panels that goes into making one of the layers). Then add your sewing allowance to that number, I use 1, 5 cm (0, 6 inches) on each side so I simply add 3 cm. (1, 2 inches) A slightly larger sewing allowance is preferred since we are using it for the channels to the strings later. Now you have the number of the top of your panel. Now take the measurement on how long you want the whole skirt to be - the length of your ruffle (you decide the length yourself, my ruffle were approximately 18 cm (7, 1 inches) ), this is how you get the length of your panels. You can chose how wide your skirt is now, I usually use the width of the fabric to decide this, so that when the fabric is folded double I can put three panels beside each other and that way get six pieces when I cut it. (see next picture) To calculate this you take the width of the fabric folded double - the top of the panels measurement divided in two. This number is the width on the bottom of your panel. 2 Now it is time to lay out your pieces, I pain directly on the fabric with a fabric pen, but you can cut the panels into paper pieces if you want to. But I find it easier to just draw on the fabric. The pieces for the overskirt should be cut approximately 7 cm (2, 8 inches) shorter then the underskirt pieces. For the width of the ruffle pieces I use the width of the fabric one again, how long they are is up to you. I use four rectangles the width of the fabric to make the ruffles on one layer of the skirt. Cut your pieces out you will not have 12 panel pieces, with six pieces of them being shorter then the other six and eight ruffle pieces that are identical to each other. Beside you, you will also have your sipper and all the string that you need. Lets start sewing. 3 Zig zag all around your pieces or overlock them if you have the ability to use the serger. Put the pieces in piles, one for the overskirt (the six shorter panel pieces and four of the ruffle pieces) and one for the underskirt (the six longer panel pieces and four of the ruffle pieces) 4 We are staring with the overskirt, the first thing we do is to attach the zipper. To two of the shorter panels. 5 Then you attach the rest of the pieces to each other good sides together, but do not sew the last panels together. It makes the next two steps easier. 6 Iron your sewing allowance apart. 7 Now we are doing the channels, Simply sew 1 cm (0, 4 inches) from the seam keeping the panels together to create the channels. Do this on all pieces, and so that you have one channel on each side of our panels. Then sew the last panels together, iron the seam allowance flat and do the channels just as you did the other channels. 8 Turn the skirt so that you have the seam allowances on the inside. You will now have 12 channels if you have made it correctly. 9 Sew the four ruffle pieces together, and iron the seam allowance flat. 10 Fold over 1 cm (0, 4 inches) and hem the bottom of the ruffle 11 Sew a gathering seam at the top of your ruffle, I use my machine set on the longest straight seam that I can use, but this can be made by hand to. 12 To make the ruffles even, put pins with all the same length between them at four places on the bottom of the skirt. The ruffle is already conveniently marked on four places by the seams. 13 Now attach the ruffle piece to the skirt at these four places, (remember: the pretty sides to the pretty sides of the fabrics). Then by pulling the end of the ruffle seam, make ruffles and pin them as you go along. 14 Sew the ruffles to the skirt. 15 See, nice ruffles you have now. 16 Now is the time to cut your strings, The sting is supposed to be twice the length of your drapes plus bit more. Cut six pieces. 17 If you want to make a skirt that you can drape a bustle with, I suggest that you have long drapes. 18 Thread a blunt needle with your string and pierce the top fabric of a channel. It should not go though to the front of the skirt. Then pull the string through the channel as long as you want the drape to be and then pierce the channel again, jump over the seam that connects the two panels and pierce the channel again. Pull the string trough the cannel back don to the ruffle again and pierce the channel again. Trim the edges of the string and knot the ends so they don’t disappear into the channels. Do this with all the strings. 19 The ends of strings should not be longer then the ruffles, this way they are not seen at all. 20 Now the overskirt is done! 21 Now repeat step 5 to 16 but with these exceptions: In step 5: in stead of inserting a zipper, sew the channels together but only up to the pint were the zipper should have been. In step 6: do sew the last channels together. Ignore step 8 and 9. Now you will have one overskirt, and one slightly longer underskirt. 22 Now put the skits tighter as they should be, the overskirt over the underskirt. Fold in the seam allowance at the opening for the zipper on the underskirt and fold down together the top of the under and overskirt and hem it 1, 5 cm (0, 6 inches) in. Hand sew the opening for the zipper on the underskirt to the overskirt to make it look neat. Then your skirt is officially finished. :D To show of the poof this skirt could need some underskirts or a simple one hoop crinoline. Under the skirt in the picture in the top is a crinoline, the crinoline is sewn as a simple skirt with the only difference is that there is steel boning in the bottom hem. As you see here, one can make both long and short skirts this way, in this skirt I in bridal satin, and have two layers ruffles on the underskirt, the ruffles are also shorter on this skirt. Good luck with your project.
14.02.2014 смотреть >> Мишки с картинками
Мишки с картинками
Очень давно мне хотелось сделать именно "дизайнерских" мишей, соединив графику с моим хобби. Так случилось, что я стала порисовывать именно иллюстрации по долгу службы, но потом втянулась и начала рисовать инфантильные картиночки для себя. Получаю от этого огромное удовольствие:) - - - - - - - - - - - - - - - - - - - - - - - I was always dreaming to combine my work as a graphic designer and my creations in order to make “designer teddy-bears”. It happened one day that I was making some illustrations at work which I really enjoyed, and I decided to make a series of tiny “baby” images for myself. Печенька / Cookie Teddy Картинки для Печеньки (он, кстати, ищет дом вместе с брошечкой, то есть, она прилагается :) Сшит из хлопкового мохера, 5 шплинтов, 20см сидя. Это, пожалуй, самый крупный мишка, что мне доводилось шить. Глазки стеклянные, брюшко мягкое с минеральным гранулятом. - - - - - - - - - - - - - - - - - - - - - - - This teddy-bear is decorated with my pictures coated with crystal resin. It is made of German cotton mohair, has black glass eyes and mineral filler. The head and paws are movable (cotter-pin joints) and forepaws are flexible. Its height is 20cm (sitting). It will take a little ice-cream brooch (4cm) to its new home:) Ищет домик For adoption Скоро-скоро Лесной миша / Woodland Teddy Coming soon. . . Для Морского миши (он маленький, поэтому картиночки всего две:) / Marine Teddy Coming soon. . . Ну и чтобы два раза не вставать — совы. Они простотак, может, потом сделаю из них брошечки. Совы прекрасные создания, благородные и невероятно забавные, я считаю:) - - - - - - - - - - - - - - - - - - - - - - - And yet another thing – owls. Just owls. Maybe they will turn into brooches later on. Owls are splendid creatures. They look really noble and at the same time amusing to me:) Have a nice day:) 6000р. + 300р. пересылка по России 225$ please e-mail me at dash16@mail. ru
18.08.2011 смотреть >>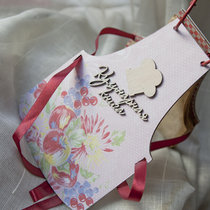 Tutorial 'Retro recipe book'
Tutorial 'Retro recipe book'
МК "Кулинарная книга в стиле ретро". Tutorial "Retro recipe book". Я очень люблю делать кулинарные книги. Даже не знаю, почему. Но страсть такая присутствует. А еще меня хлебом не корми, дай "постарить" странички для таких книг. Как я это делаю, я и хочу показать. I really like to do recipe books. I do not know why. And I really like to do retro pages for these books. Now I'll show you how I do it. Хоть у меня был полный набор для декорирования Кулинарной книги, в который входят 40 страничек, я их все равно вынула, взяв одну в качестве шаблона. Обвела и вырезала странички из белой бумаги. Even though I had a complete set for decorating recipe book, which includes 40 pages, I took one as a template and cut out pages of white paper. Получилась вот такая стопочка: What I got: И вот тут уже начинается самое интересное. Делаем "раствор". Для него подойдет и чай, и кофе (а еще различные пищевые красители, если вы хотите сделать цветные странички). Чай дает более слабый цвет и почти не дает запаха. Кофе (причем брать надо самый дешевый) - более темный цвет и запах! Вся квартира в период окрашивания пахнет кофе =) And here is the fun begins. Make a tea to coffee "liquor" (and you can even use colouring agent, if you want coloured paper). Tea gives a weak color and almost does not smell. Coffee (you should take the cheapest) gives a darker color and smell. Итак, разводим наш кофе в необходимой пропорции: чем больше кофе, тем темнее будут наши странички. Перепробовав множество способов, я теперь просто закладываю всю пачку в ванночку и оставляю на некоторое время. Это, правда, для тонкой бумаги грозит растворением. Если бумага довольно плотная, то эксперимент пройдет хорошо. Если боитесь, вот другой способ: окрашивать листы большой кистью. Долго, но точно без проблем. So dissolve our coffee in the necessary proportions: more coffee means darker color of our pages. I just put the whole pages pack in a tray and leave for a while. But don't do this with thin paper. If the paper is dense enough, the experiment goes well. If you're afraid, that's another way: paint sheets with the big brush. Long way, but without problem. Дальше не менее утомительный процесс - просушка. Можно разложить листы по всем поверхностям, можно положить на батарею одной стопкой, а можно - в духовку! Да-да, на совсем небольшую температуру, а газовую еще и приоткрыть надо будет. Но при это листы просыхают очень быстро, вот только придется пожертвовать нижним и верхним листами, скорее всего. Next long process is drying. You can put each sheet anywhere or put all pack. . . in the oven! Yes, yes, to a very small temperature. And if you have gas oven you still need to open it a little. But pages dry out very quickly. But you have to sacrifice the bottom and top pages. Если боитесь держать их в духовке до последнего, можно досушить утюгом. Гладить можно и по несколько листов сразу. Главное - делать это через какую-нибудь тряпочку и выключить паровой режим. If you are afraid to keep them in the oven until the last moment you can dry pages with iron (several sheets at once). The main thing is to do it through some cloth and turn off the steam mode. Пока сушатся наши листики, можно заняться декорированием обложки. Я взяла чипбордные надпись "Кулинарная книга" и поварской колпак и покрыла их кракелюром. На обложку пошли листы MF. While our pages dried, we can decorate our cover. I took chipboard word "recipe book" and chef's hat with crackle paint. Cover was made with sheets of MF. Внутри оформила подобие фартучка: Like apron inside: А вот и наши листочки "подоспели": And here is our pages: На этом, кстати, процесс можно и не заканчивать, а, например, воспользоваться штампиками "Состав" и "Способ приготовления". Или взять любые другие штампы, например, завитушками и пройтись по страничкам. You can use cook stamps or take any other stamps, such as curls. Приятного вам приготовления! :) Enjoy your cooking! :)
16.11.2012 смотреть >>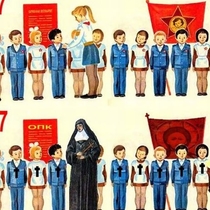 свято место не должно пустовать )))
свято место не должно пустовать )))
Патриарх Московский и всея Руси Кирилл обратился к Министерству образования и науки с предложением расширить преподаваемый в четвертых классах курс «Основы религиозных культур и светской этики» (ОРКСЭ) на другие года обучения. Была религия - коммунизм, свято место пусто стало ))) Парень, ты чего? Не грусти! I said, young man, pick yourself off the ground Эй ты, парень, ну-ка встань-ка с земли! I said, young man, 'cause your in a new town Ты же, парень, в новый город пришел, There's no need to be unhappy Где нет по-во-да для гру-сти! Young man, there's a place you can go Парень, заходи-ка сюда, I said, young man, when you're short on your dough Эй ты, парень, грусти нет и следа, You can stay there, and I'm sure you will find Оставайся, и тогда ты поймешь, Many ways to have a good time. Что по-ра по-ве-се-лить-ся! It's fun to stay at the Y. M. C. A. Ведь круто с нами жить в И. М. Х. О! It's fun to stay at the Y. M. C. A. Ведь круто с нами жить в И. М. Х. О! They have everything for young men to enjoy Здесь есть все, для того, чтоб парням отдохнуть, You can hang out with all the boys. Здесь раздолье для нормальных перцев! It's fun to stay at the Y. M. C. A. Ведь круто с нами жить в И. М. Х. О! It's fun to stay at the Y. M. C. A. Ведь круто с нами жить в И. М. Х. О! You can get yourself clean, You can have a good meal И помоют тебя, и накормят тебя, You can do whatever you feel Можешь делать, что захочешь, мы твоя семья Young man, Are you listening to me Парень, ты же слышишь меня? I said, young man, what did you want to be Эй ты, парень, выбор твой за тебя! I said, young man, you can make real your dreams А ну, парень, могут сбыться мечты! But you've got to know this one thing Но ты должен знать о том, что: No man, does it all by himself Неа, в одиночку никак! I said, young man, put your pride on the shelf Зажми, парень, всю гордыню в кулак, And just go there, to the Y. M. C. A. Отправляйся прямиком в И. М. Х. О, I'm sure they can help you today Там те-бе все-гда по-мо-гут! It's fun to stay at the Y. M. C. A. Ведь круто с нами жить в И. М. Х. О! It's fun to stay at the Y. M. C. A. Ведь круто с нами жить в И. М. Х. О! They have everything for young men to enjoy Здесь есть все, для того, чтоб парням отдохнуть, You can hang out with all the boys. Здесь раздолье для нормальных перцев! It's fun to stay at the Y. M. C. A. Ведь круто с нами жить в И. М. Х. О! It's fun to stay at the Y. M. C. A. Ведь круто с нами жить в И. М. Х. О! You can get yourself clean, You can have a good meal И помоют тебя, и накормят тебя, You can do whatever you feel Можешь делать, что захочешь, мы твоя семья Young Man, I was once in your shoes Парень, я был точно таким I said, I was down and out with the blues Как ты, брат мой, грустным и никаким. . I felt, no man cared if I were alive Мне казалось, всем плевать на меня I felt the whole world was so jive И весь мир ка-кой-то лжи-вый. . That's when someone came up to me Парни подбежали вдвоем, And said young man take a walk up the street Кричат: «Эй, ты! Ну-ка быстро подъем! There's a place there called the Y. M. C. A. Пойдем вместе, загляни в И. М. Х. О. They can start you back on your way. Ow!! Там те-бе по-мо-гут вы-жить!» It's fun to stay at the Y. M. C. A. Ведь круто с нами жить в И. М. Х. О! It's fun to stay at the Y. M. C. A. Ведь круто с нами жить в И. М. Х. О! They have everything for young men to enjoy Здесь есть все, для того, чтоб парням отдохнуть, You can hang out with all the boys. Здесь раздолье для нормальных перцев! Y. M. C. A. И. М. Х. О. It's fun to stay at the Y. M. C. A. Ведь круто с нами жить в И. М. Х. О! Young man, Young man, there's no need to feel down Парень, пацан, ты чего? Не грусти! Young man, Young man, pick yourself off the ground Парень, пацан, ну-ка встань-ка с земли! Y. M. C. A И. М. Х. О. and just go to the Y. M. C. A. Ведь круто с нами жить в И. М. Х. О! Young Man, Young Man, Парень, пацан, я был точно таким. I was once. . . Только я стал совершенно другим….
27.01.2016 смотреть >>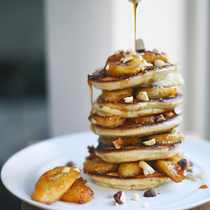 Chocolate filled pancakes. Recipe for a bright family breakfast
Chocolate filled pancakes. Recipe for a bright family breakfast
Originally published at Yellow Chimney. Please leave any comments there. In the morning slanting sun rays penetrate into the dining room through the thin netting. They carefully grope window-sill, table and a white doily lying on it. The warm touches slide on the white chair backs, flutter from one side to another, quivering from every curtain movement and each wiggle of trees outside. Sun rays softly stroke sleepy eyelashes and sweet rose lips of kids, who are waiting for their breakfast. The kids, a boy and a girl, idly stretch their pyjamas, continue watching their last fairy dreams right at the table. It’s Sunday. No need to hurry. No need to push your sleepy legs to find the right side of the trousers. No need to rush your sleepy jaws to chew… Quiet sunny slumber reigns in the dining room, until mum puts a plate full of pancakes on the table. And when the kids find out there’s chocolate filling in the centre, the last traces of sleep disappear and a funny-talking-laughing family breakfast begins. Recipe: (yields 12-15, serves 4-5, cooking time 25 minutes) Read the rest of this entry »
19.02.2016 смотреть >>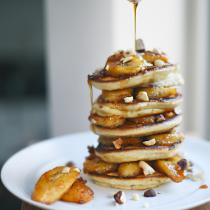 Chocolate filled pancakes. Recipe for a bright family breakfast
Chocolate filled pancakes. Recipe for a bright family breakfast
Originally published at Yellow Chimney. Please leave any comments there. In the morning slanting sun rays penetrate into the dining room through the thin netting. They carefully grope window-sill, table and a white doily lying on it. The warm touches slide on the white chair backs, flutter from one side to another, quivering from every curtain movement and each wiggle of trees outside. Sun rays softly stroke sleepy eyelashes and sweet rose lips of kids, who are waiting for their breakfast. The kids, a boy and a girl, idly stretch their pyjamas, continue watching their last fairy dreams right at the table. It’s Sunday. No need to hurry. No need to push your sleepy legs to find the right side of the trousers. No need to rush your sleepy jaws to chew… Quiet sunny slumber reigns in the dining room, until mum puts a plate full of pancakes on the table. And when the kids find out there’s chocolate filling in the centre, the last traces of sleep disappear and a funny-talking-laughing family breakfast begins. Recipe: (yields 12-15, serves 4-5, cooking time 25 minutes) Read the rest of this entry »
19.02.2016 смотреть >>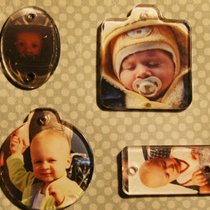 Return and tutorial
Return and tutorial
Решила я реанимировать свой блог, а заодно перенести сюда свои МК, сделанные для Challenge-km-shop. I decided to revive my blog and publish my tutorials made for Challenge-km-shop. Акриловые стеклышки как предмет интерьера Acrylic glass slides as a piece of interior Я все гадала, зачем же каждый раз заказываю индекс-принт с маааааленькими превьюшками фотографий. Гадала, пока не увидела акриловые стеклышки. Сразу же зажглась идеей сделать гирляндочки в детскую. I still wondered why I every time order index prints with very small thumbnails of photos. Wondered, until I saw the acrylic glass. And immediately decided to make a garland. Итак. Нам понадобятся фотографии, скрап-бумага и стеклышки. На каждую гирлянду у меня отведено по 4 стеклышка, 3 с отверстиями по обеим сторонам, 1 - побольше с одной дырочкой. So. We need the photos, scrap paper and glass. At each garland I need 4 pieces of glass, 3 with holes on both sides, 1 - with one more hole. В каждой гирлянде по две фотографии: в стеклышко побольше и в какое-нибудь среднего размера. Each garland for two photos: for a big glass and one - medium size. Сажала я стеклышко на Glossy Accent. Наливать его много не надо, иначе при фиксировании стеклышка, он выйдет за края и застынет, придется обрезать. I used the Glossy Accent. You don'r need much, or it will leave the edges and freeze while you'll be fixing a photo. Кроме фотографий у меня в гирлянде участвовала скрап-бумага. По одному мальчику, и по одной машинке на гирлянду. Их тоже сажала на Glossy Accent. I used photos and scrap paper. According to one boy and one machine on a garland. They also put on a Glossy Accent. Следующий этап - декорирование обратной стороны. В принципе, изначально можно брать двустороннюю бумагу, чтобы декорировать пришлось только стеклышки с фотографиями, но я хотела, чтобы "задник" везде был одинаковый. The next step - decorating the backside. Basically, you can take two-sided paper to decorate only one side, but I wanted back-sides everywhere the same. На этом этапе можно фиксировать бумагу на клей. At this stage, we can fix the paper on the adhesive. Канцелярским ножом все аккуратно вырезаю. Cut carefully. Вот, что у меня получилось: Here's what I got: Аккуратно проделываю дырки в бумаге там, где в стеклышках отверстия, и нанизываю их на шнур (подойдет и лента). Оставляю большой хвостик, за который потом буду крепить гирлянду. На этом этапе главное - смотреть, чтобы шнур не перекрутился, иначе все стеклышки будут смотреть в разные стороны. Вот такая композиция перед тем, как все повесить: Carefully made a hole in the paper and strung them on a cord. I leave a big tail, for which I will then attach garland. At this stage, the main thing - look, the cord is not twisted, or all the slides will look in different directions. Here's a garland before I hang up it: Теперь в детской у нас на карнизе висят две гирлянды. Слева: Now we have two garlands in my son's room. On the left: И справа: And on the right: Отдельно мне нравится то, что это и украшение интерьера, и памятная вещь, так как в гирлянде - фотографии моего сына. Хорошего вам творчества! I like the fact that this was the interior decoration, and a commemorative item because there are photos of my son in the garland. Have a nice creativity!
09.11.2012 смотреть >>


